December20

The other night I was making gingerbread cookies, and Oz kept looking at me longingly thinking they were dog treats. I realized I didn’t have any more left for him so I decided I could also make him some cookies so we could enjoy the cookie goodness after dinner. It was my first time making doggie treats, so I went to several websites and checked the recipes but didn’t like any of them specifically, so I came up with my own based on some of the stuff I read. All the ingredients are dog safe, unless your dog is allergic to some foods. They are super easy to make and Oz loves them, so I think I will definitely try to keep them stocked. Oh, and don’t forget to make small ones and bigger ones so you have a variety. My next project will be cat treats 🙂
Ingredients
2-2 1/2 cups of flour
1/2 cup wheat bran
1/2 cup brewers’ yeast
1/2 cup cornmeal
1/2 cup powdered corn meal
1 tbsp chunky peanut butter (unsweetened)
3 tbsp canola oil
1 1/2 cups low sodium chicken stock or as needed
1 egg
Process:
Preheat Oven at 400 F
- Mix dry ingredients well in a bowl.
- Whisk oil, egg, peanut butter, and egg until smooth.
- Start adding the flour mixture a fourth at a time alternating with the chicken broth.
- When the dough is not a sticky turn onto a table with a little flour sprinkled and knead a few times.
- Form a disk and spread it to about 1/4″ thick and cut into shapes. Make bigger ones and smaller ones so you can have different size treats. Put on lightly oiled cookie sheets (or with parchment paper or silpats)
- Bake for 10 minutes, brush with more chicken stock, bake for another 10 minutes. Turn off the oven and leave the treats in there for about 30-40 minutes until they harden and dehydrate more.
- Make sure you don’t brown them too much because they’ll get a little bitter, so if your oven is hotter in the back, flip them around and/or lower the temperature.
- Let them cool.
- Make your dog super happy!
Benefits from feeding your dog Brewer’s Yeast:

Dog owners give their pets brewer’s yeast for a variety of different reasons.
First, brewer’s yeast is a great source of B vitamins such as biotin, trace minerals such as zinc, proteins, and amino acids. The amino acids and vitamins can help make your dog’s skin healthier and its coat shinier.
Second, brewer’s yeast is often recommended by holistic vets to help strengthen dogs’ immune systems. According to the Encyclopedia of Natural Pet Care, in one study, brewer’s yeast was shown to protect chickens from salmonella-tainted feed.
Brewer’s yeast is also a common natural remedy for dogs with fleas. Holistic veterinarian Richard Pitcairn recommends it for that purpose. It is thought to work against fleas because it contains sulfur compounds that make your dog less palatable to fleas. However, at least one study showed that brewer’s yeast provided dogs no protection whatsoever against fleas compared to a control group.
September2
 This soup was an experiment based on a recipe found on Epicurious.com, I ended up making some “adjustments” to fit fresh ingredients from our garden and it turned out AMAZING. You can make it quickly for a weeknight dinner or you can dress it up and serve it for company. SO good!
Pistou – n. A sauce made of garlic, basil, olive oil, and often Parmesan, used on pasta or in soups and stews. [French, from Provençal, from pestar, to crush, from Old Provençal, from Late Latin pist re; see piston.]
Ingredients:
Soup
- 4 large zucchinis roughly chopped
- 1 small yellow onion
- 1 large carrot, peeled and chopped
- 1 large potato, peeled and chopped
- 3 tabsp of butter
- 1 tbsp Olive oil
- 4 cups of chicken broth
- Salt & Pepper to taste
Pistou
- 1/2 of a cup of loosely packed parsley
- 1/4 cup of basil leaves
- 1/4 cup of mint leaves
- Olive oil
- 2 tbsp of water
- Salt to taste
Process:
Heat oil and melt butter in a big pot. Add the onion and cook it until it’s transparent and fragrant. Add the vegetables, salt, pepper and sautee for a few minutes, then add the chicken broth. Simmer on low for about 20 minutes until the vegetables are very soft. Let cool a little bit and then puree using an immersion blender, or put in the blender in batches being careful not to make it explode and get all over your kitchen if it’s too hot. Return to pot and keep warm. Adjust seasoning if necessary.
This is a slight variation from traditional Provençal Pistou, but it really kicks up the flavor of the recipe.
Make the Pistou:Â In a food processor pulse all the herbs and the salt until chopped, then add the water and pour the olive oil until it comes together (about 1/4 cup).
Ladle the soup in bowls and add a tablespoon of the pistou in the middle.
Note:
If you want to make the soup look more elegant, you can coat a few zucchini blossoms with seasoned flour and deep fry until crisp. Drain on paper towels. Toast a couple slices of whole wheat bread and using a cookie cutter cut some croutons out. Place a zucchini blossom and a crouton next to the pistou in the soup. You will really impress guests!
July29
 This is more like a process than an exact recipe. We have been lovingly tending our garden this Summer and we’re starting to get amazing results. We harvested our first zucchini and a few tomatoes, along with many delicious herbs. So I decided to make this pasta for dinner tonight. It turned out delicious and very flavorful, but not heavy on your tummy like some of the heavier marinara type of sauces. These are the ingredients I used, but you can switch it up depending on what you have around.
Ingredients:
- Pasta (I used Penne but bowties, oricchete or rotini will do)
- 1 large zucchini diced
- 1 bell pepper diced
- Corn (about one ear’s worth cut off) but you can use a bit of frozen sweet corn
- 2 medium tomatoes or about 4 small romas, diced
- 1 medium onion, diced
- 3 garlic cloves finely chopped
- Fresh herbs, chopped (I had basil, oregano and thyme, but you can use parsley or whatever you have, I put in lots)
- A good squirt of olive oil
- 2 tbsp of butter
- White wine and reserved pasta water (about 1/2 cup of each as necessary)
- Grated lemon peel
- Parmesan Cheese
- Salt & Pepper to taste
Process:
 Cook the pasta in a big pot. While it’s cooking, heat the olive oil in a large skillet and cook the onion and garlic until very fragrant. Add the rest of the veggies and saute for a little while until they start getting soft (but not too much), add the butter, half of the Parmesan cheese grated, grated lemon peel, herbs and wine. Bring to a boil. The pasta should be ready by now, drain (but reserve like one cup of the water) and put in the pan with the sauce. Add a bit of the reserved pasta water. Salt and pepper to taste. Serve with extra Parmesan shavings on top and a cold glass of white wine.
June30
 This is the first of several lavender recipes I will add to my blog this Summer. I LOVE lavender, it’s probably my favorite herb. It’s purple (my favorite color as you know), it smells great, it has soothing and relaxing properties and old herb lore lists many “magical” attributes for this fragrant herb. For me it’s definitely magical as it reminds me of the Summer I spent in Provence. I’m very lucky because the house we bought in Fort Collins has an amazing set of Lavender plants in the front yard. There are about 10 plants, 9 are English Lavender varieties, probably Sachet, and one is a darker flower, probably Spanish Lavender.   This year I have started harvesting the blooms and making little bunches to hang upside down to dry. The whole house smells yummy!

Ingredients:
- 2 cups of water for the syrup
- 1/4 cup of sugar
- 1/4 cup of honey
- 20 fresh lavender sprigs, stems and all and 1 tbsp lavender leaves ORÂ 1-2 tbsp of dry lavender buds (which tend to be stronger than fresh if you buy them at a gourmet store).
- 1 cup of fresh lemon juice
- 2-4 cups of water
- Ice
- Fresh lavender sprigs for decorating
- Thin slices of lemon for decorating
Process:
 Boil 2 cups of water and dissolve the honey and sugar in it. Put the lavender sprigs and leaves, cover and let it sit for at least half an hour and up to 24 hours (you can put it in the fridge).
When the syrup is ready, strain the syrup into a glass pitcher and remove all the lavender sprigs and leaves. Add the lemon juice, more water and ice. Stir well and add a few sprigs of fresh lavender blooms and a few slices of lemon as decoration.
This is the prettiest summer drink EVER!!!
June29
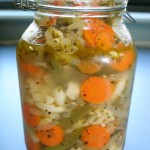
 Chiles en Escabeche are a Mexican staple, this recipe was assembled from some scribbles and notes while helping my aunt Cristina make a big pot of them to can for gifting. It was a fun day in the kitchen… we made TONS and I had the “honor” of processing the onions, garlic cloves and chiles, hehehe, that’s what happens when you’re the “pinche”. These chiles are in many restaurants at the table and most people keep them at home. You can add them to any savory dish, tortas, tacos, or just munch on the escabeche veggies as a snack. This particular recipe has serrano chiles, and a lot of them, for a less “picante” version try seeding and deveining the chiles, or use Jalapeños. You can also use less chiles and more veggies, a common practice because a lot of people LOVE the veggies, especially the carrots. In some recipes they use more olive oil, or the spices and herbs are adjusted to taste depending on what you like. Also, some recipes call for baby potatoes, quartered and blanched, that taste very very good but the starches tend to cloud the escabeche liquid. Think of this recipe more as a set of guidelines and have fun… think green beans, bell peppers, zucchini, etc… So yummy!
Ingredients:
- 15-20 Chiles Serranos sliced in half lengthwise
- 2 Onions sliced into thin half-rounds
- 2 heads of garlic, separated and peeled (I use 3 heads some times)
- 3 large carrots, peeled and sliced in rounds
- 1 small cauliflower head, separated into florets
- 2 tsp of mexican oregano (dry), or use a mix of fresh and dry
- 1 tsp of thyme
- 1/2 tsp of marjoram
- 4 bay leaves
- 5 pepper corns
- 3 whole allspice corns
- 2 whole cloves
- 1 tbsp of salt (or to taste)
- 1/4 of a cup of olive oil
- 3 cups of vinegar
- 1 cup of water
Process:
- Blanch the carrots and cauliflower in plenty of water. Drain and set aside.
- In an enameled or stainless steel pot heat the olive oil, sauté the onions and garlic for a few minutes, then add all the herbs and spices, sauté for another minute or so.
- Add the chiles, carrots and cauliflower florets into the onion/garlic mix, and salt and sauté for a few minutes.
- Pour the vinegar and water into the pot and let it boil for 2-3 minutes, until the vinegar releases some of its alcohol.
- Put the escabeche in clean jars, wait until it has completely cooled off and refrigerate (use within a month), or can into sterilized jars and keep in the pantry for up to 6 months.
- The escabeche is much better after a week or so.
Notes:
 For a less acidic recipe, use a bit more water and less vinegar, but I like mine with a “bite”.
Make sure you do the whole thing in a non-reactive pan because otherwise the vinegar with corrode it.
In my hometown (Ixtapan de la Sal, Mexico), they do whole jars of garlic cloves, or they use Manzano chiles, which are a bigger and slightly less picante version of habaneros (please note the ‘slightly’ part). Lots of good memories of home…


 re; see piston.]


